We’ve been trying to get better at the sustainability thing here at winedirect.com.au... the wines you are ordering are now quite likely to arrive in a cardboard box that we’ve reused, rather than just using recycled cardboard. It’s better for the planet and keeps our costs down which in turn enables us to spend a bit more on the delicious wines you’ve been receiving. If we’ve got sturdy enough cardboard in da house, we are using it to get your precious wines out to you...
We’ve noticed other areas we can improve on too... we open lots of wines here at Wine Direct HQ... of late we’ve been checking out the contents of 60-70 bottles a week, hunting for the only the "good stuff". However, when we pour the bulk of that wine down the sink afterwards... what a waste! We figured a better way to respect the winegrower's and winemaker's endeavour and the resource they have grown and crafted was to do something good and with the leftovers. So, we decided to have a crack at making vinegar, not to sell, just to use at home. And the flavour is awesome! Much better than the kit you can find in your supermarket.
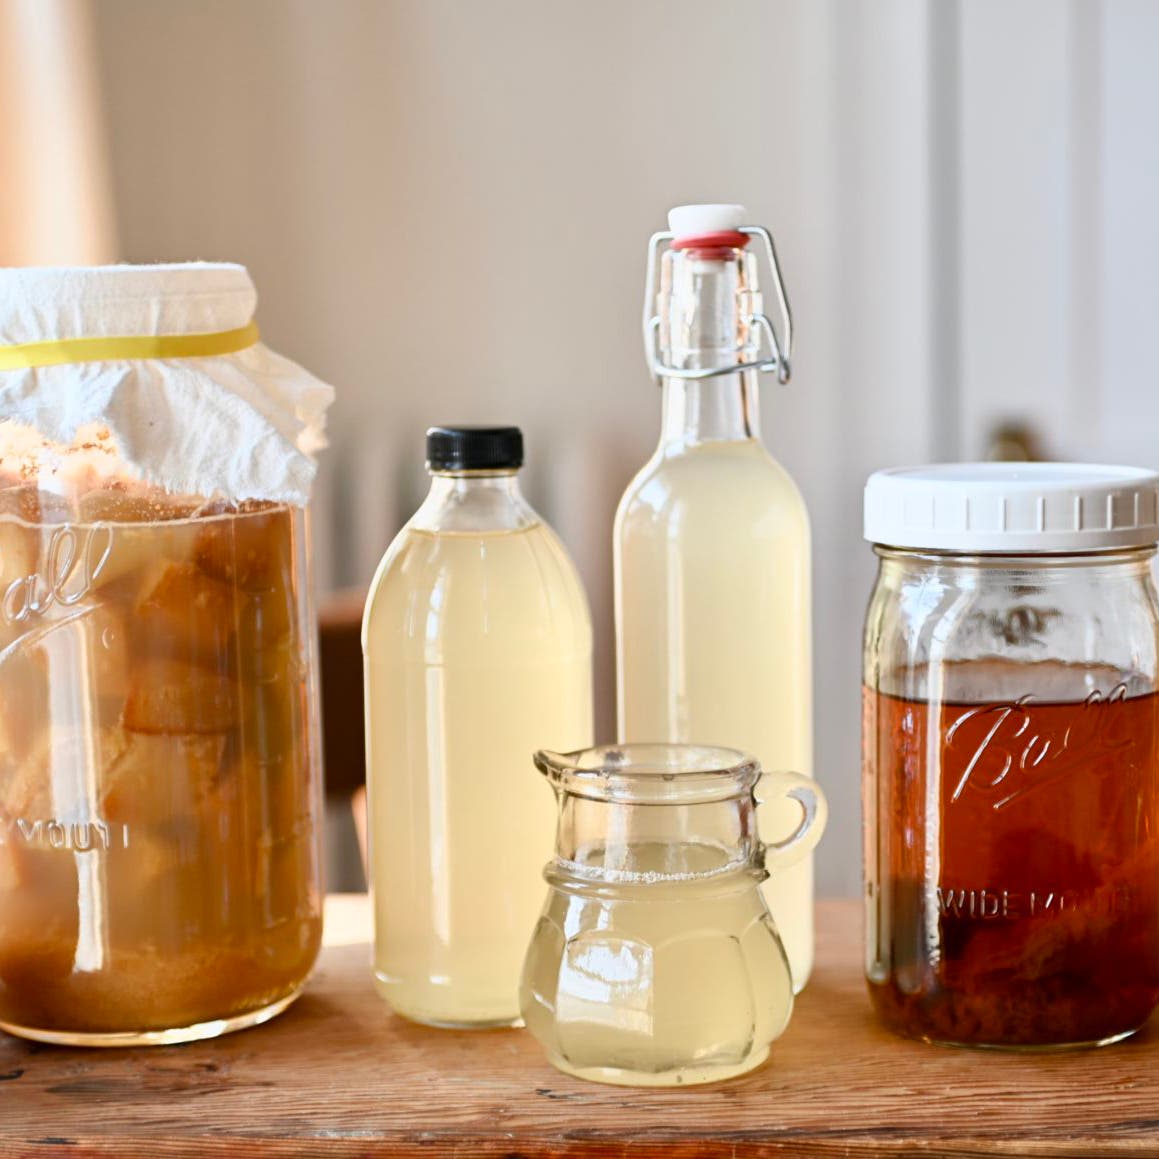
We are now we are making 20L batches of red wine vinegar and smaller quantities of jus and glazes... all long lived and super handy to have floating around the kitchen. This is something you can do at home too... with as little as half a bottle of leftover red (what's that?). We recommend using glass or enamel jars but plastic will work too... just don’t use metal, it will corrode and bugger up the taste of your magical elixir.

Making with a half bottle of red (and of course you can make white wine vinegar or blend red and white as well):
- Pour the red into a sterilised jar with a wide mouth. Seal then shake to aerate. Add about 70ml of raw/live/unpasteurised vinegar to the mix. Bragg raw apple cider vinegar is great for this.
- Add enough water to dilute the liquid to 10-12% alcohol... too much alcohol and the mother will struggle to convert the alcohol into acetic acid bacteria, dilute too much and the vinegar won’t keep well.
- Cover the mouth of the jar with a cheesecloth and use a rubber band to hold it in place. This will stop any nasties like fruit flies falling in while allowing oxygen to interact and begin converting alcohol into acetic acid.
- Leave the vinegar somewhere dark and in a position as close to 20 degrees as possible. Don’t move it as you’ll disturb, and potentially compromise the mother... just check in on the aromas occasionally. You should find that over the course of a week or so a translucent disk will start to form on the surface.
- If you see green black or white mould forming you’ll need to remove it and if it grows back you’ll need to turf the batch.
- After 3-4 weeks you should be able to smell the aromas of vinegar developing. At 6-8 weeks you should have a lovely batch of vinegar ready to use in salad dressings, soups, stews and slow roasted dishes, or transform into a glaze or jus.
- Strain, bottle and get into it, or age in bottle for up to a year to allow it to soften. If you decant it carefully, leaving the mother in the original fermentation vessel, you can simply start again without the need to add more vinegar... just make sure you get fresh wine into the vessel straight away or the mother will die.
Alternately if you are making a big batch, strain off what you want to use in the short term, and top the fermentation vessel back to its original level.
Given you have used good quality wine and diluted to 10-12% alcohol prior to adding the mother, it will be super tasty and tangy. You’ll likely want to dilute with some water before using. - Finally, if you are making a big batch, you might want to pasteurise it to guarantee good shelf life. Heat the vinegar to between 60 and 70 degrees C in a non reactive pan for half an hour before decanting into sterilised bottles. Alternately, don’t pasteurise, decant into sterilised bottles and store in the fridge... this will inhibit the mother from continuing to grow.


Bloody hell, it’s too strong
Your finished product is likely to have a much higher level of acidity than the stuff you’ll find in the supermarket, likely 2-3 times as strong. There’s a fair chance you’ll love the explosive flavours but find the acidity a little challenging to your palate and your dental enamel! To counter this. simply adjust to the right level of tang for your palate by diluting with water before using. Once you have made your vinegar, you can also use it to make other fun, tasty and useful things.
Balsamic vinegar alternative
Take 5 parts vinegar to 1 part sugar, maple syrup or honey and heat until the sugar is dissolved. Rather than diluting the vinegar with water, as per our suggestion above, you can adjust it with a little bicarb... just use a pinch at a time and taste as you go... it adds a certain saltiness to the end product but from a flavour perspective that will be effectively countered by the sugar you are also adding.
Red wine vinegar glaze (Balsamic glaze alternative)
Start with the process above but reduce the liquid by anywhere between a 1/3 and 2/3, depending on how intense and unctuous you want the glaze to be.
So if you’ve got half a bottle of red lying around, consider having a crack at making vinegar... it’s so much tastier than supermarket fare and its good for the planet... just like reusing cardboard. It's good for the planet and ultimately ends up in you getting tastier wines.